


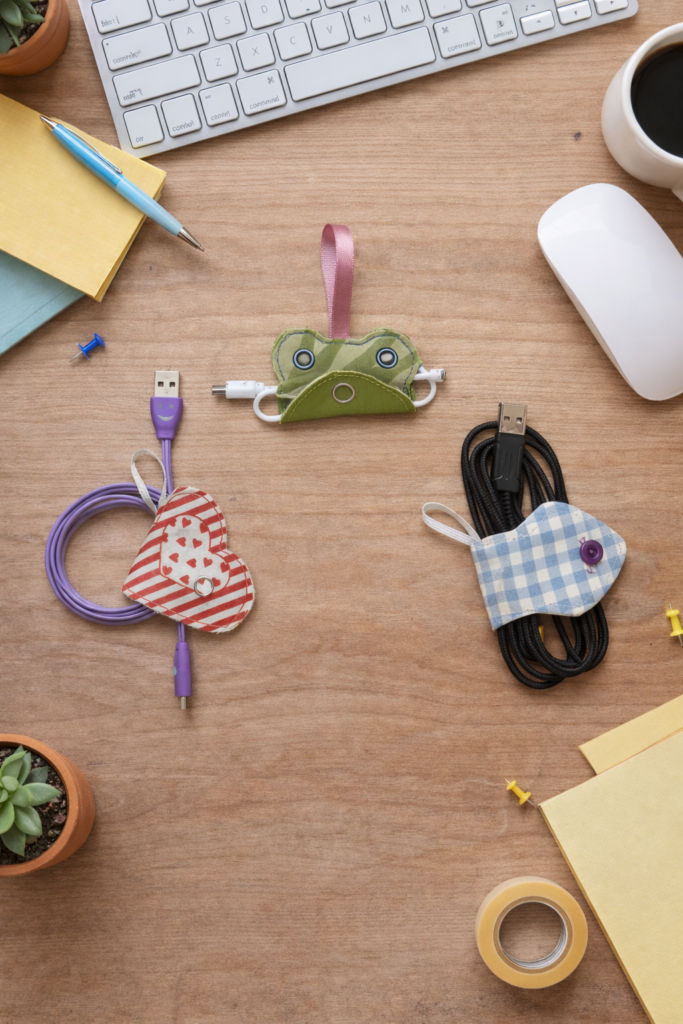
Keep the ordered cables can be a challenge, especially when we use Loaders, hearing aids or USB cables Every day. East fabric cable organizer is a easy seam project What can you do with fabric slices And it's also very nice.
In this article you will find everything you need to create your own cable organizer from scratch:
✅ Step by step tutorial with clear and detailed instructions.
✅ Video on YouTube to follow each stage of the process visually.
It's ideal for seam beginners and to take advantage fabric slices which are usually left over from other projects. It is an excellent alternative to maintain the ordered desk or organized backpack in a practical way.
- Materials for the Cable Organizer
- Stamped fabric and smooth fabric.
- Interplay it for a firm finish.
- The color of the fabric or to make contrasts.
- Fabric marker.
- 3 Satin belts 14cm
- Pressure button with pliers
- Eye pliers
- 2 eyes
- 1cm button
- Sewing machine, scissors, pins and iron.
Free cable organizer pattern
☕Video tutorial of the cable organizer
If you want to see how I made these cable organizers step by step, you can watch the video here. In the video I show the complete process and some details that help make them better.
How to sew the cable organizer step by step
In the video I make three designs: a fish, a little slot and a heart. We start with the fish, which is the simplest, and then I tell you what changes in the other two. They're all sewn with the same technique.
Fish-shaped cable organizer
Step 1. Prepare the tapes (optional).
Make a simple knot on each of the 3 14 cm satin tapes. They are optional, but they give a nice touch and serve to contrast colors.
📷 Photo suggested: close-up of the ribbons on the table, next to the scissors and the thread.
Step 2. Gather the fabrics and marbles.
Place the fabrics right and secure them with pins. With the fabric marker, draw the edge where you're going to sew.
📷 Photo suggested: the two fabrics stacked with the pins on and the line of the visible marker.
Step 3. Sew the button.
Sew a button on the right side of the fabric (the stamping or the smooth). It's a close-up later.
📷 Photo suggested: detail of the sewn button, with hand or needle in sight.
Step 4. Sew the contour leaving an opening.
Sew through the marked line and leave an opening to turn. You can do it by machine or hand with pespunte, so this version is also worth if you don't have a machine.
📷 Photo suggested: the form of fish already sewn, with the marked opening (you can mark it with a pin).
Step 5. Cut and pee.
Cut the left-over leaving 1 / 2 cm of margin. Make small cuts (picket) in the curves so that the shape will look good when turning.
📷 Photo suggested: scissors doing a picket on the curve, without getting to the seam.
Step 6. Flip and iron.
Turn through the opening and iron well.
📷 Photo suggested: the fish already turned and ironed, flat on the table.
Step 7. Put the tape on and make the final pespunte.
Put the tape in the middle (you can choose colors that contrast) and sew the edge to 3mm. Don't get over it when you start or finish. This step is slow through the curves and short distances, so take it easy.
📷 Photo suggested: the seam of the edge with the tape already placed. If you have it, a picture with the needle almost on the curve helps a lot.
Step 8. Close the seam.
Finish where you started and make a double knot with the beginning and end threads (if they are of the same color, better).
📷 Photo suggested: detail of the double knot at the point of binding.
Step 9. Make the eye.
For the 1 cm button, the eye is 1.5 cm (1 / 2 cm more than the button). From the point marked, it measures 0.75 cm to the left and 0.75 cm to the right to focus. It is normal that it is not perfect by hand, but it does its function and, when closed, imperfections are no longer seen.
📷 Photo suggested: the mark of the eye with one rule next to it, and another with the end eye closed with the button.
Variant:
- Use cotton fabric with design and a smooth, or leather. If the fabric doesn't shirk, you can put it upside down.
- Mark the edges and choose a contrast thread or as much as possible to the fabric.
- If the fabric is fine, put it in the back to give it stiffness. If it's thick, you don't have to.
- Repeat the same sewing process as in fish.
- Close with pressure button.
- For the eyes use eyes: make the holes with the pliers and then change the matrix to place them. Then put the tape in the middle and sew only the part of the eyes, passing through the previous seam.
📷 Suggested photos: the front-end range (the most attractive photo of the post), a detail of the eyes with eyes and the pliers in action.
Variant: heart
- Put it into question and follow the same process as with the little band.
- In half, it measures 1 / 2 cm and holds the tape with a pin. Sew a retreat in the middle to secure it and cut it carefully.
- If you don't have pressure buttons, you can use brushes (they are easy to sew). I sew up where the interfabric is and put together the pieces as in the fish, so the seam can't be seen.
- At the end, iron to remove the fabric marker.
📷 Suggested photos: the finished heart and, if you can, the three organizers together on a table with a charger and a rounded hearing aids (photo for real use, also ideal for Pinterest).
Variations and uses
These organizers serve:
- USB cables
- Headphones
- Loaders
- Computer cables
- Backpacks and bags
- Travel
✅ Common tips and errors
🔹 Use thick fabric if you want more resistance
🔹 Reinforce seam if the cable is heavy
🔹 First try the size with the cable
With a few materials you can make a practical and reusable organizer that helps keep the cables sorted and prevents them from getting tangled.
Now it's your turn. Show us your version of fabric cable organizer! 🔌
📸 Share your project on social networks with the hashtag # Our Cables Organizers and join a community of seam lovers. We'll love to see your creations and the fabrics and shapes you chose to organize your cables.✂️🧷
📍 Subscribe to our mailing list to receive more tutorials, ideas with fabric slices and easy sewing projects that will inspire you to continue creating.