


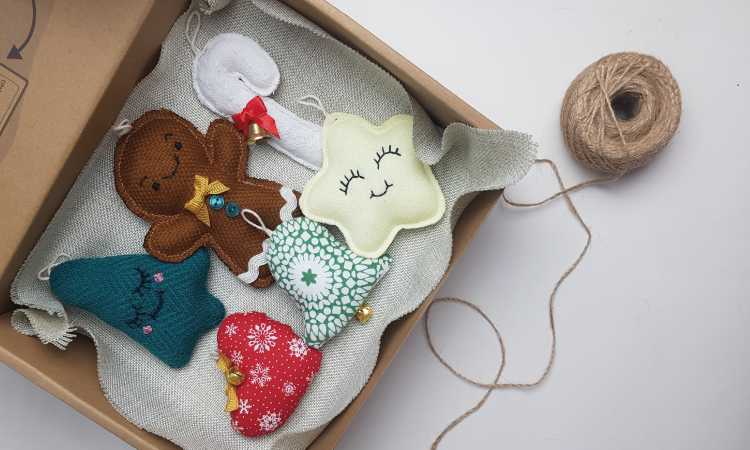
Christmas is the perfect time to fill our home with warmth and creativity, and there is nothing more special to decorate with hand-made Christmas ornaments. The Christmas garlands with fabric are a beautiful, economic and sustainable option to give a unique and personalized touch to your Christmas decoration.
In addition, this article includes a free pattern ready to download and access to our video tutorial on YouTubewhere you can follow the whole process from beginning to end.
Whether you're looking for a fun family-sharing activity or want to start selling your hand-made Christmas decorationsThis tutorial will give you all the tools you need. What do you expect to start creating your own Christmas magic?
✂ Sewing materials for Christmas garlands
In our step by step tutorial, you will learn to create your own fabric Christmas garlands using different types of tissues, from loops you have at home to special fabrics you can acquire. You'll also find out easy sewing techniques and valuable advice to achieve a professional finish in your creations.
- Recycled fabric of Christmas colors
- Wool or flare (recycled filling of old pillows)
- 2 9mm buttons
- 10mm satin tape
- White zig zag tape
- Cascabel and / or bell
- Yarn of cotton
Sewing tools
- Common or embroidery thread black and pink
- Needle and thread of fabric color
- Scissors
- Poultry
- Ruler
- fabric marker
- Sewing machine
Step by Step to Make Christmas Guirnalds with Tela
1. Cut the Patron
Start by downloading the free pattern available in this tutorial. Print the design and recite it with scissors. This will be the guide for the pieces of fabric that will form your garland. Make sure you choose a size corresponding to your project.
2. Make the Nudos for the Hanger
Cut about 12 cm of jute rope or cotton to use as a hanger. Tie a simple knot so that the garland has a solid support and is easy to hang.
3. Draw the Pattern on the Tape
Place the pattern on the fabric you have chosen and, with a pencil or fabric marker, draw the outline. Repeat this step as often as necessary to complete all the pieces that will form your garland.
Note: Use fabric straps with Christmas designs or classic colors like red, green and gold to give a festive touch to your Christmas garland of fabric.
4. Place the Hanger
Before sewing, place the pieces of fabric with the right sides facing (right with right). If the piece is not going to turn, as in the case of the ginger doll made of a harpiller, it places the pieces with the opposite sides facing (reverse with reverse). Then position the hanger in the center of the pieces of fabric and fix it with pins to make sure that the pieces remain in place while the seams.
Note: This step is crucial for the fabric garland be well assembled.
5. Sew the Parts
With a sewing machine or needle and thread, join the parts following the previously marked contour. Use small stitches to get a more professional finish and ensure the ends well to prevent them from thinning.
Important: Leave a small unsewed space, preferably on a side, to be able to turn the fabric to the right later.
6. Cut and turn the pieces
Cut the fabric surplus leaving a margin of approximately half an inch from the seam. This will help reduce the volume in seams.
Make small picket (cuts) on the curves and corners of the seam, taking care not to reach the stitches. This step allows the fabric to take a soft and rounded shape when turning it, rather than being rigid or square.
6. Fill and Close with Invisible Seat
Use the space you left unsewed to turn the piece to the right. Make sure the seams are well defined; use a tool like a stick or pencil to push corners and curves. Thanks to the picket, the curves will be better adapted, giving a more polished finish.
Enter guata or fill your choice through open space. Add enough to make the parts firm but manageable, taking care not to override them.
Use a Invisible stitch to close the remaining opening.
With these adjustments, you Christmas garland with fabric will have an impeccable finish, with soft and well defined curves that will highlight every detail of the design. An ornament worthy of admiration!
7. Decorate
The decoration of your figures Christmas garland with fabric It's the most fun and creative part. Here I share the ideas I used to customize each element:
🎄 Tree
- Materials: Black embroidery thread or double common thread, pink thread.
- Technical: We bowed our eyes and mouth with the technique of point back using black thread. For cheeks, we use pink thread and the same technique, creating a charming design that gives a joyful touch to the tree.
🔔 Bell
- Materials: Small rattlesnake.
- Technical: We sew a rattlesnake right in the center of the bell to simulate the uvula. This detail not only decorates, but also adds a festive sound to the Christmas garland of fabric.
⛄ Ginger Man
- Materials: embroidery thread, two small buttons, zigzag tape, decorative tie.
- Technical: We soften the eyes and mouth with the point-back technique, sew two buttons in the chest to simulate the buttons of a coat, add zigzag tape in the arms and legs as additional decoration, and end with a tie in the neck to give it a festive and fun finish.
🌟 Star
- Materials: embroidery thread, decorative link (optional).
- Technical: We purge the details (such as eyes, mouth, or decorative lines) using a back point. Optionally, we add a small loop at the top to enhance the design.
🎁 Baston
- Materials: Decorative, rattlesnake (optional).
- Technical: We roll the cane with a loop, making sure it is firm and well distributed. If we want to add more details, we sew or stick a rattlesnake next to the loop at the top.
❣️Heart
- Materials: Decorative blade, rattlesnake.
- Technical: We place a loop along with a small rattlesnake at the top. This simple design highlights the warmth and tenderness of the ornament.
These decorations will make your garland stand out and become the focus of your Christmas decoration!
🎄Step-by-step video video of Christmas Guirnald with Tela
If you prefer to learn visually, we have the perfect tutorial for you! In our video in YouTube, we show you every stage of the process to make this beautiful Christmas garland with fabric.
Find out how to cut the pattern, sew the pieces and decorate them with unique details, all explained in an easy and detailed way!
👉 Click here to watch the video and start creating your own Christmas magic. 🎄✨
Congratulations! Now you know how to create a beautiful Christmas garland with fabricfrom cutting the pattern to decorating each piece with unique details. This project is not only a creative way to customize your Christmas decoration, but also an excellent opportunity to practice your sewing skills.
Final tips:
- Experience different fabrics and colors to give your garland a personal touch.
- Add extra details, such as sequins or bright ties, to make it even more prominent.
- Remember to plan the distribution of the figures on the string before assembling it for a balanced design.
Now it's your turn: Show us your creativity!
Share your project on social networks with the hashtag # My Christmas Guirland 2024 and connect with a community of seam lovers.
👉 Subscribe to our mailing list to receive more free patterns, tutorials and exclusive tips that will inspire you to continue creating. 🎄✂️